Have you every wanted to extract a particular field from a flat file that was hundreds or thousands of lines long?
Now, I bet your saying, sure you could import the file into Excel, OpenOffice.org Spreadsheet or some other spreadsheet application, but what fun would that be. That would mean using your mouse, but your a keyboard kind-of-person. In addition, opening very large files may leave spreadsheet applications very sluggish.
So whats the alternative? AWK (or gawk). Awk is a command line program that can do just what you wish. For example, lets say that you wanted to extract all the full names from your system's /etc/passwd file. Now you could import the file in your favorite spreadsheet application, specify a delimiter, and wait for it to process, depending on the size of your passwd file. Alternatively, you could run the following awk command:
awk -F: '{print $5}' /etc/passswd
This command uses the '-F' flag to specify the semicolon as a delimiter. The 'print $5' section tells the program to print out the 5th field in the file. Finally /etc/passwd specifies the file to extract the field from.
Now I bet you are saying, so what? How did this help me at all, and why didn't I just use the spreadsheet? Well, not only did you not have to import the file into the spreadsheet program, but you can easily pipe the output of this program to other useful applications that allow you to accomplish what you need to. A quick example, is the ability to pipe the output through the 'sort' command which will then list the users full names in alphabetical order.
Still not convinced that this was easier than opening your precious spreadsheet application. When you are referencing a data source that changes often, such as the passwd file on high usage *nix systems, awk definitely pulls its weight. You could easily setup an alias, or a shell script to execute the command for you, and now you can simply type a few characters and hit enter as opposed to fiddling with your spreadsheet, waiting for it to import the data, and dealing with the slow responsiveness as all your system memory is used up.
Give it a try.
Monday, March 26, 2007


Sunday, March 25, 2007
Beryl: Lack of Dual Video Card Support
I recently upgraded from one EVGA Gefore 6800 PCI Express card which had two 19" Widescreen Samsung Syncmaster monitors to two Gigabyte Geforce 7300 LE video cards. Since they were both nvidia cards, the upgrade was quite easy. I was required to make a few updates in the /etc/X11/xorg.conf. These weren't to bad. It required adding another video card section, or 'device' and then linking that device to one of the other monitors and adding it to the server layout.
The really disappointing thing was the lack of beryl support for multiple video cards. At first I thought that some configuration item was messed up, so I started troubleshooting. I closed beryl manager and opened beryl through the command prompt and I was able to see the error regarding ROR which would not allow beryl to start.
I started looking through the forums on the beryl website and I did find a few places that explained why this was not possible, although there were a few posts that eluded to the possibility of two video cards and beryl. In order to clear up confusion, I created a post to try to get a straight answer. After a few days, I received no response, so I posted again.....still no response. Here is the link to the forum post. Maybe someone will reply, but until then it seems impossible to use beryl with two video cards and one extended desktop. (Note: Beryl does work with two video cards if you use two separate X sessions. You can still drag the mouse between them screen, but you cannot drag windows between the sessions or interact in any other way.)
The really disappointing thing was the lack of beryl support for multiple video cards. At first I thought that some configuration item was messed up, so I started troubleshooting. I closed beryl manager and opened beryl through the command prompt and I was able to see the error regarding ROR which would not allow beryl to start.
I started looking through the forums on the beryl website and I did find a few places that explained why this was not possible, although there were a few posts that eluded to the possibility of two video cards and beryl. In order to clear up confusion, I created a post to try to get a straight answer. After a few days, I received no response, so I posted again.....still no response. Here is the link to the forum post. Maybe someone will reply, but until then it seems impossible to use beryl with two video cards and one extended desktop. (Note: Beryl does work with two video cards if you use two separate X sessions. You can still drag the mouse between them screen, but you cannot drag windows between the sessions or interact in any other way.)
Auto Complete
Possibly the single greatest feature in a Linux system is auto complete. If you have never used this feature before, open a shell and start typing a command, and press the 'Tab' key before you finish typing it.
This feature saves so much time when typing commands and especially paths. But it isn't just a time saver.
Another great use for it is to verify the existence of files and directories. For instance, if you think a file exists in /etc/apt/ called sources.list but you aren't sure, you can type:
'less' (or cat or more) followed by '/etc/apt' and then start pressing the 'Tab' key. The auto complete feature will first add a '/' to the end of '/etc/apt', which verifies that it is in fact a directory, and then when you continually press tab, it will display the files within the directory.
Mastering the use of the auto complete feature is one of the first steps to saving yourself a lot of time when using the command line.
This feature saves so much time when typing commands and especially paths. But it isn't just a time saver.
Another great use for it is to verify the existence of files and directories. For instance, if you think a file exists in /etc/apt/ called sources.list but you aren't sure, you can type:
'less' (or cat or more) followed by '/etc/apt' and then start pressing the 'Tab' key. The auto complete feature will first add a '/' to the end of '/etc/apt', which verifies that it is in fact a directory, and then when you continually press tab, it will display the files within the directory.
Mastering the use of the auto complete feature is one of the first steps to saving yourself a lot of time when using the command line.
Thursday, March 01, 2007
Apache2 and SSL on Ubuntu
A perfect small guide to setup apache2 and ssl on ubuntu:
(from: http://ubuntuforums.org/archive/index.php/t-4466.html)
A Mini-Howto for apache2: :)
apt-get install apache2
apache2-ssl-certificate
(and answer the questions)
Now, enable ssl:
a2enmod ssl
configure ssl:
cp /etc/apache2/sites-available/default /etc/apache2/sites-available/ssl
ln -s /etc/apache2/sites-available/ssl /etc/apache2/sites-enabled/ssl
"/etc/apache2/sites-enabled/ssl" should look like this:
NameVirtualHost *:443
(... configure the directories too...)
and "/etc/apache2/sites-enabled/default" should look like this:
NameVirtualHost *:80
(... configure the directories too...)
In /etc/apache2/ports.conf, add Listen 443
In the middle of /etc/apache2/sites-available/ssl file, insert this two lines:
SSLEngine On
SSLCertificateFile /etc/apache2/ssl/apache.pem
Hope it helps :)
(from: http://ubuntuforums.org/archive/index.php/t-4466.html)
A Mini-Howto for apache2: :)
apt-get install apache2
apache2-ssl-certificate
(and answer the questions)
Now, enable ssl:
a2enmod ssl
configure ssl:
cp /etc/apache2/sites-available/default /etc/apache2/sites-available/ssl
ln -s /etc/apache2/sites-available/ssl /etc/apache2/sites-enabled/ssl
"/etc/apache2/sites-enabled/ssl" should look like this:
NameVirtualHost *:443
(... configure the directories too...)
and "/etc/apache2/sites-enabled/default" should look like this:
NameVirtualHost *:80
(... configure the directories too...)
In /etc/apache2/ports.conf, add Listen 443
In the middle of /etc/apache2/sites-available/ssl file, insert this two lines:
SSLEngine On
SSLCertificateFile /etc/apache2/ssl/apache.pem
Hope it helps :)
Tuesday, February 27, 2007
firefox evince and acroread using mozplugger
The problem: Have both acroread (Adobe acrobat reader for linux), and evince (a pdf reader for linux) installed, but by default have documents open in firefox tabs in evince and not acroread.
The reason both need to be installed is because acroread allows you to fill in and print interactive pdfs, but evince is much more lightweight and scrolls much better. Evince overall leaves my system more responsive when using it.
By default with acroread installed, it becomes the default for opening PDFs in firefox while using mozplugger. In order to have evince be the default PDF reader in firefox you need to modify mozplugger's settings which are stored in:
/etc/mozpluggerrc
Open this and find the section:
application/pdf:pdf:PDF file
application/x-pdf:pdf:PDF file
text/pdf:pdf:PDF file
text/x-pdf:pdf:PDF file
Now find the line that reads:
ACROREAD()
Now you will need to move that line below the line similar to:
repeat noisy swallow(evince) fill: evince "$file"
So you should end up with:
application/pdf:pdf:PDF file
application/x-pdf:pdf:PDF file
text/pdf:pdf:PDF file
text/x-pdf:pdf:PDF file
repeat noisy swallow(evince) fill: evince "$file"
ACROREAD()
Now close all firefox windows and start it again.
The reason both need to be installed is because acroread allows you to fill in and print interactive pdfs, but evince is much more lightweight and scrolls much better. Evince overall leaves my system more responsive when using it.
By default with acroread installed, it becomes the default for opening PDFs in firefox while using mozplugger. In order to have evince be the default PDF reader in firefox you need to modify mozplugger's settings which are stored in:
/etc/mozpluggerrc
Open this and find the section:
application/pdf:pdf:PDF file
application/x-pdf:pdf:PDF file
text/pdf:pdf:PDF file
text/x-pdf:pdf:PDF file
Now find the line that reads:
ACROREAD()
Now you will need to move that line below the line similar to:
repeat noisy swallow(evince) fill: evince "$file"
So you should end up with:
application/pdf:pdf:PDF file
application/x-pdf:pdf:PDF file
text/pdf:pdf:PDF file
text/x-pdf:pdf:PDF file
repeat noisy swallow(evince) fill: evince "$file"
ACROREAD()
Now close all firefox windows and start it again.
Monday, January 15, 2007
Flash in 64 bit Linux
I was FINALLY able to get it working. I wish I would have found this earlier. It worked like a charm:
https://help.ubuntu.com/community/FirefoxAMD64FlashJava
https://help.ubuntu.com/community/FirefoxAMD64FlashJava
Tuesday, December 19, 2006
Firefox Memory
Now everyone has heard the firefox memory leak rumors.....errrr.....feature announcement....yea....Ok, feature or no feature, c'mon:
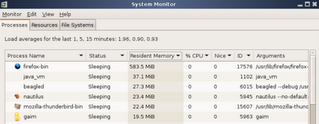
I have a feature request.....remove this one.....

I have a feature request.....remove this one.....
Saturday, December 02, 2006
HOWTO: Set your system up for Wake On LAN (WOL) - Ubuntu Forums
This site has a great and quick how-to for setting up wakeonlan. I set it up but haven't yet tested to make sure it works on my desktop, which is set to suspend after 1 hr of inactivity
HOWTO: Set your system up for Wake On LAN (WOL) - Ubuntu Forums: "Automatic way:
This script does everything described in the Manual way, for you, except step 1 and step 4.
------------------------
The automatic method is super dialup friendly! thanks to gzip compression the filesize is a mere 1.5kb! almost half the extracted size of 3.4kb!
1. If you havent already, go to your BIOS, and turn on WakeOnLAN (it varies, look for it.) If your network card is onboard, your set for step 2, otherwise there is probably a cable that should go from your network card to your motherboard, though this is not always the case.
Before continuing, note the interface you want to do this to. Most people know how to do this, if you do not, look at step 2a of the manual method.
2. Download and extract this: You can do it with the GUI and run the extracted program in a terminal by double clicking it, or open a terminal and do the following:
Code:
wget http://shell1.zsuatt.com/~ctucker5/lanwake/lanwake0.9.tar.gz tar -zxvf lanwake0.9.tar.gz ./wolinstall0.9.bash
3. As the exit of the program notes, now you just need to get/use a wake on lan sending program, like wakeonlan.
4. Sit on your lazy *** and have fun
"
HOWTO: Set your system up for Wake On LAN (WOL) - Ubuntu Forums: "Automatic way:
This script does everything described in the Manual way, for you, except step 1 and step 4.
------------------------
The automatic method is super dialup friendly! thanks to gzip compression the filesize is a mere 1.5kb! almost half the extracted size of 3.4kb!
1. If you havent already, go to your BIOS, and turn on WakeOnLAN (it varies, look for it.) If your network card is onboard, your set for step 2, otherwise there is probably a cable that should go from your network card to your motherboard, though this is not always the case.
Before continuing, note the interface you want to do this to. Most people know how to do this, if you do not, look at step 2a of the manual method.
2. Download and extract this: You can do it with the GUI and run the extracted program in a terminal by double clicking it, or open a terminal and do the following:
Code:
wget http://shell1.zsuatt.com/~ctucker5/lanwake/lanwake0.9.tar.gz tar -zxvf lanwake0.9.tar.gz ./wolinstall0.9.bash
3. As the exit of the program notes, now you just need to get/use a wake on lan sending program, like wakeonlan.
4. Sit on your lazy *** and have fun
"
Monday, November 27, 2006
GDM (Login Screen) Resolution Too Big to Fit Screen
This black friday I purchased two 19" widescreen samsung 931bw's. I had a problem getting the optimum resolution (1440x900 for one and 2880x900 for two) to work properly in ubuntu.
I had added 1440x900 to the appropriate modelines, which once I when to System -> Preferences -> Screen Resolution and changed it from 2880x1000 to 2880x900 it worked fine for my gnome session.
The problem was that the login window was too big. It was still using 2880x1000 for some reason. I found this web page which offered a fix:
GDM (Login Screen) Resolution Too Big to Fit Screen? Try this… « Linux FUD: "Read Ubuntu Forum Post"
To fix it I removed everything from the 24 bit modeline in the screen section except 1440x900, and in all other modelines outside of the screen section. Upon rebooting, the login screen was no longer bigger the than monitor and it worked fine in the session also.
I had added 1440x900 to the appropriate modelines, which once I when to System -> Preferences -> Screen Resolution and changed it from 2880x1000 to 2880x900 it worked fine for my gnome session.
The problem was that the login window was too big. It was still using 2880x1000 for some reason. I found this web page which offered a fix:
GDM (Login Screen) Resolution Too Big to Fit Screen? Try this… « Linux FUD: "Read Ubuntu Forum Post"
To fix it I removed everything from the 24 bit modeline in the screen section except 1440x900, and in all other modelines outside of the screen section. Upon rebooting, the login screen was no longer bigger the than monitor and it worked fine in the session also.
Friday, November 17, 2006
RAID: Growing & Software Vs. Hardware
Growing:
Software Vs. Hardware
Basically the step includes adding a disc to the array as a spare, then growing the array onto this device.
mdadm --add /dev/md1 /dev/sdf1
mdadm --grow /dev/md1 --raid-devices=4
This then took about 3 hours to reshape the array.
The filesystem the needs to be expanded to fill up the new space.
fsck.ext3 /dev/md1
resize2fs /dev/md1
Software Vs. Hardware
An interesting real case experiment of various raid levels, and file system options.
Using RAID 5 with chunk of 128k, and Ext3 with a stride of 16 and block of 4k seems to be the best!
..and something that suprises me is that raid 50 was slower and less cost effective in terms of available storage than Raid 5.
I spent last night reformatting my raid array into RAID 10, then kernel RAID 10 level (rather than a RAID 0 array of RAID 1 arrays), then RAID 50, before going back to RAID 5. There was no real difference in output, and since RAID 5 maximises the storage space, it was an easy decision.
Which indicates that I need a much faster external SCSI box. All the discs are 10k u160 or better. The box is only a SUN UW Box. e.g. u40. I guess the bus is completely saturated!
For anybody who wants to experminent with software RAID in linux, MDADM is really the way to go. It’s just so easy….!
mdadm -v --create /dev/md0 --raid-devices=6 --level=raid5 /dev/sd[abcdef]1
mkfs.ext3 /dev/md0
mount /dev/mdo /mnt/raid
will create, build a filesystem and mount a 6 drive RAID 5 array. I should mention that between steps 1 and 2, you really should wait until the array has finished synchronising and reconstructing itself. Although this point is not essential, it will slow things down. Also MDADM is quite clever, and leaves a drive out as a spare. It constructs the array in degraded mode. That is the array is missing a drive. This speeds things up as there are less drives to saturate the bus.
Linux Software RAID
I recently setup a hardware raid 0. I was interested in setting up a raid 5 array for the redundancy aspect, but hardware raid 5 controllers are too expensive. After reading a few pages, I have decided to setup a linux software-based raid 5 array. I plan to use the following howtos.
Linux Software RAID
The Software-RAID HOWTO
Linux Software RAID
RAID 5 improves on RAID 4 by striping the parity data between all the disks in the RAID set. This avoids the parity disk bottleneck, while maintaining many of the speed features of RAID 0 and the redundancy of RAID 1. Like RAID 4, RAID 5 can survive the loss of a single disk only. RAID 5 is supported by Fedora Linux. Figure 26.2 illustrates the data allocation process in RAID 5. Linux RAID 5 requires a minimum of three disks or partitions.
powered by performancing firefox
Thursday, November 16, 2006
Gmail Controlling Junk Mail
This site explains how you can add a plus sign '+' along with a string to your gmail address which will still be delivered to you, but will allow you to filter out that information later on.
For example:
stocks29+test@gmail.com
This will still be delivered to by gmail account, but now I can create a filter based on the To: line of the email. This will allow me to control junk messages that arrive in the inbox from signup sites and also allow me to see who is spamming me.
For example:
stocks29+test@gmail.com
This will still be delivered to by gmail account, but now I can create a filter based on the To: line of the email. This will allow me to control junk messages that arrive in the inbox from signup sites and also allow me to see who is spamming me.
Monday, November 13, 2006
k9copy
I installed k9copy today, which is a DVD backup program for linux. Using the "Penguin Liberation Foundation" repositories for edgy. It looks like a great easy to use GUI.
I tried it for a quick minute, but got distracted, and when I came back it had crashed. Ill test it out again later.
I tried it for a quick minute, but got distracted, and when I came back it had crashed. Ill test it out again later.
Tuesday, November 07, 2006
Re: [Freevo-users] "No action defined for this choice!" error :-(
Re: [Freevo-users] "No action defined for this choice!" error :-(: "Re: [Freevo-users] 'No action defined for this choice!' error :-(
nikosapi
Sun, 23 Jul 2006 07:46:15 -0700
Sorry to bother you all but I found the solution, it was as simple as adding MPLAYER_VERSION = 9999 to my local_conf.py"
Not sure why this fixed the freevo problem, but it did.
nikosapi
Sun, 23 Jul 2006 07:46:15 -0700
Sorry to bother you all but I found the solution, it was as simple as adding MPLAYER_VERSION = 9999 to my local_conf.py"
Not sure why this fixed the freevo problem, but it did.
Monday, November 06, 2006
Allow nautilus to browse smb: edgy
HOWTO: Enable nautilus integration with beagle - Page 3 - Ubuntu Forums: "That's due to other changes in gnome-vfs. You have to install the libgnomevfs2-bin and libgnomevfs2-extra packages. Then restart nautilus (with a killall nautilus in a terminal)."
This is how to fix the nautilus browsing smb problem.
This is how to fix the nautilus browsing smb problem.
Sunday, October 29, 2006
lxdvdrip in Ubuntu
How to install lxdvdrip using .deb packages. Although it says it is for Breezy, it worked in Edgy.
Edit:
This site has the most updated repository:
http://ftp.sh.cvut.cz/MIRRORS/debian-multimedia/pool/main/l/lxdvdrip/
Edit:
This site has the most updated repository:
http://ftp.sh.cvut.cz/MIRRORS/debian-multimedia/pool/main/l/lxdvdrip/
Thursday, October 26, 2006
Swap not mounted in Edgy
So I upgraded to Edgy. Nice so far. A few problems with Beryl and now this:
The symptoms I experienced:
- Unbearable slowness with multiple applications open.
- Noticed the swap in the system monitor said 0% of 0 bytes.
This is when I realized the swap space wasn't mounted.
After viewing the forums I found a bug report. There were directions which fixed the problem and they worked:
1. Run the mkswap command on your current swap partition. So if your swap partition is /dev/sda3 you would run:
mkswap /dev/sda3
2. Now you need to record the UUID produced by mkswap. Keep this handy.
3. Next you need to update the /etc/fstab file. Find the line referring to the swap partition. Change the UUID on that line to the UUID produced by mkswap.
4. Next you need to edit the /etc/initramfs-tools/conf.d/resume file. This file should read:
RESUME=UUID=
Note: Replace with the actual UUID reported by mkswap.
5. Lastly, you need to regenerate the initramfs. To do this run:
update-initramfs -u
Now you should be able to reboot and have your swap space enabled and be able to hibernate.
The symptoms I experienced:
- Unbearable slowness with multiple applications open.
- Noticed the swap in the system monitor said 0% of 0 bytes.
This is when I realized the swap space wasn't mounted.
After viewing the forums I found a bug report. There were directions which fixed the problem and they worked:
1. Run the mkswap command on your current swap partition. So if your swap partition is /dev/sda3 you would run:
mkswap /dev/sda3
2. Now you need to record the UUID produced by mkswap. Keep this handy.
3. Next you need to update the /etc/fstab file. Find the line referring to the swap partition. Change the UUID on that line to the UUID produced by mkswap.
4. Next you need to edit the /etc/initramfs-tools/conf.d/resume file. This file should read:
RESUME=UUID=
Note: Replace
5. Lastly, you need to regenerate the initramfs. To do this run:
update-initramfs -u
Now you should be able to reboot and have your swap space enabled and be able to hibernate.
Sunday, October 01, 2006
CUPS Login UserName - Ubuntu Forums
Want to use the cups web interface in ubuntu. Here is how:
CUPS Login UserName - Ubuntu Forums: "d root' in a console, follow the dialogue and make a root password. Then 'su' to change to root (a # will be shown in the console)t"
CUPS Login UserName - Ubuntu Forums: "d root' in a console, follow the dialogue and make a root password. Then 'su' to change to root (a # will be shown in the console)t"
HOWTO: Install Cups-PDF - Ubuntu Forums
I found this website which is a reference for setting up a PDF printer that takes all input and outputs PDF files. Very useful.
HOWTO: Install Cups-PDF - Ubuntu Forums: "Doubleclick 'New Pinter'"
HOWTO: Install Cups-PDF - Ubuntu Forums: "Doubleclick 'New Pinter'"
HOWTO: Install Cups-PDF - Ubuntu Forums
I found this website which is a reference for setting up a PDF printer that takes all input and outputs PDF files. Very useful.
HOWTO: Install Cups-PDF - Ubuntu Forums: "Doubleclick 'New Pinter'"
HOWTO: Install Cups-PDF - Ubuntu Forums: "Doubleclick 'New Pinter'"
Subscribe to:
Posts (Atom)